Containerizing Web Apps and CI Build Pipeline - 3/21/2024 Overview I wanted to share my recent journey of containerizing two of my web applications, a Flask app (this website) and a Go web app (ginrcon), and then building a CI/CD pipeline to automate building and publishing the Docker image. Let's dive in! The Motivation Behind Containerization As the deployment complexity of my projects grew, I found managing VMs, dependencies, scaling, and patching to be increasingly challenging. I've been consuming and deploying Docker containers for awhile for various services at home, such as Pi-hole, Unifi, a Matrix stack, and more. I've seen the advantages of containers as an administrator, so from the development perspective, I knew containers promised consistency across different environments, simplified deployments, and enhanced scalability. Flask App Containerization I started by creating a Dockerfile for my Flask app. This involved specifying a base image, copying my app's code into the container, installing dependencies, and exposing the necessary ports. Since I had already written a Linux service unit file, I stuck with running the Flask app with Gunicorn. To ensure the web app would also run highly-available, I planned on deploying it in a replicated fashion, so I utilized Docker Compose for my Swarm. This allowed me to define the replication definition in a simple YAML file, alongside the image spec. Go App Containerization One of the perks of Go is its ability to compile to a single binary. Leveraging this, I created a Dockerfile for my Go app, ensuring it downloaded dependencies and compiled within the build container, on a pinned Go version, for consistency. Since Go compiles to a binary, my Dockerfile for the Go app focused on creating a minimalistic image, resulting in faster builds and smaller image sizes. This is why I chose to use Alpine Linux as the final image. This lead to me using a multi-staged build to accomplish all intended goals. CI Pipeline After determining the needed image build and publishing workflows to ensure my image was available on the GitHub Container Repository (GHCR), I figured setting up a CI pipeline to handle those steps for me automatically would further contribute to a consistent image, in addition to being easier to manage. Since these projects were both already hosted on GitHub, I chose GitHub Actions to run the pipeline. Leveraging GitHub Actions' flexibility, I wrote a workflow to build Docker images that works for both apps, triggered by Releases on the project. Once the image is built successfully, another step in the workflow pushes these images to the associated package repo (GHCR), with the version auto-detected based on the Release version. Conclusion The migration of my Flask and Go web apps into containers, coupled with the establishment of a Docker image build and publish pipeline, has improved my development and deployment workflows. Containerization has not only enhanced portability, scalability, and availability, but also simplified the management of dependencies. With a reliable CI/CD pipeline in place, I'm better equipped to iterate on my projects in the future. For future improvements, after developing unit tests for these projects and have a seperate workflow run those on commit automatically. |
Highly Available DNS for Home Network - 11/23/2023 A recent project I worked on was improving the fault tolerance of my home network, specifically DNS. Previously, I was running a single instance of Pi-hole, which filters out unwanted DNS queries, and forwarded the rest to my upstream Windows Domain Controllers with integrated DNS. From there, queries go out to a public resolver. This approach had a few drawbacks. Two issue stemmed from that the Pi-hole instance was running bare-metal on a Raspberry Pi, which while usually reliable, was not tolerant of hardware issues. Patching the Raspberry Pi or rebooting it for other reasons would also cause a DNS service outage, which was undesirable. The Raspberry Pi was also being used for other services which occasionally could introduce undesirable system load. Another issue I could often encounter, if the upstream Windows DNS servers stopped responding to queries, Pi-hole cached these failed lookups, which would persist even after the issue with the upstream Windows servers was resolved and required a service restart. The solution I designed is pictured below. DNS queries are now sent to a single IP address (192.168.1.2), provided via DHCP, which is a load balanced IP address on my ADC (now NetScaler again) VPX appliance, pointed at two Pi-hole instances.  NetScaler Configuration Getting a NetScaler instance up and running is actually pretty easy, since as of v12.1, Citrix offers a Freemium licensing option, which is bandwidth restricted to 20 Mbps and doesn't provide access to certain features like GSLB or Citrix Gateway, but neither limitation is an issue for this use case. Configuring a simple load balancer for servers on a NetScaler isn't particularly difficult and many general guides exist. At a high level, you need to: - Define the servers that will provide the DNS service. - Define a Load Balancing Service Group containing those servers. - Define a Load Balancing Virtual Server, with a Virtual IP listening at the IP address you'll be pointing clients to, and bind the above Service Group. Additionally, you can bind a monitor for the Service Group to ensure DNS lookups function properly, rather than servers just responding to pings or other simple health checks. I configured a DNS monitor with the parameters shown on the right, specifically to query for my local domain name, and ensure it resolves to one of the IP addresses of my domain controllers. Multiple IP addresses can be added to the list to be considered a valid response. Don't forget to save your changes since they won't persist through reboot otherwise!  Pi-hole Container Setup The upstream Pi-hole instances are configured with Docker Compose, deployed as containers on a Docker Swarm cluster, and managed via Portainer. I opted for Docker Swarm over a more complex tool like Kubernetes given the relatively low complexity of this project's requirements. I may follow up with migrating these containers to being managed with Kubernetes in the future. Creating a Docker Swarm and joining nodes to it is fairly straightforward, and Docker's own documentation is pretty great for those steps (link). Managing these Pi-hole containers via Docker Compose and deploying them to the cluster was more complex since not a lot of reference documentation existed. To the side is the Docker Compose YAML used for this. A couple things to note about the Compose file: This is running in replicated mode with the intent to be deployed to two specific nodes. This is handled via the settings under "deploy". Specifically note the requirement of the target nodes requiring the label of "pihole==true". This can be set via command line from the Swarm leader: "docker node update --label-add pihole=true <node id>" I'm directly publishing the container's ports to the corresponding ports on the host. This will use direct volumes for storage on the nodes, rather than bind mounts. Most of the Pi-hole settings are configurable via the Compose file. However not all of them are, particularly custom defined Allow/Blocklists entries, Client Group Management, and others. For these settings, I recommend exporting/importing via the Teleporter backup feature under the settings page. These will be stored in the "pihole.etc" volume. Example Compose File 123456789101112131415161718192021222324252627282930313233343536373839404142434445464748495051525354 version: '3.8' services: pihole: image: pihole/pihole:latest deploy: mode: replicated replicas: 2 update_config: delay: 30s placement: max_replicas_per_node: 1 constraints: [node.labels.pihole==true] restart_policy: condition: on-failure max_attempts: 3 delay: 30s window: 120s ports: - target: 53 published: 53 protocol: tcp mode: host - target: 53 published: 53 protocol: udp mode: host - target: 80 published: 80 protocol: tcp mode: host environment: DHCP_ACTIVE: 'false' DNSMASQ_LISTENING: 'all' DNS_BOGUS_PRIV: 'true' DNS_FQDN_REQUIRED: 'true' PIHOLE_DNS_: '192.168.1.5;192.168.1.6;fe80::b1f2:c67d:5464:e10f;fe80::f576:da56:d322:4dc' REV_SERVER: 'true' REV_SERVER_CIDR: '192.168.0.0/16' REV_SERVER_TARGET: '192.168.1.5' REV_SERVER_DOMAIN: 'domain.lan' TZ: 'America/Chicago' WEBTHEME: 'default-dark' volumes: - pihole.etc:/etc/pihole/ - pihole.dnsmasqd:/etc/dnsmasq.d/ networks: - host networks: host: external: true volumes: pihole.etc: pihole.dnsmasqd: - A single IP to point to for DNS queries reduces network complexity - When defining two DNS servers for clients, clients only fail over to the secondary one if the first is unavailable. This allows DNS queries to be consistently balanced between both Pi-Hole nodes and reduce system load. - The custom DNS monitor ensures my upstream Windows servers are answering domain queries with healthy responses. - Pi-hole containers defined via YAML increases flexibility to deploy additional nodes if needed. - The primary disadvantage of this setup is a single point of failure remains, with the NetScaler node being the listening IP for DNS queries. I found this risk to be tolerable though since I dont use my NetScaler VPX for other purposes, and its significantly more stable by comparison to the DNS servers themselves. In the future, I'd like to further investigate maintaining between synchronicity between the Pi-Hole docker nodes. I plan to do this with either the handy gravity-sync tool by vmstan, and/or by using shared storage for the volumes being used by the docker nodes. |
Configuring a Hub-Spoke VPN with WireGuard - 5/13/2022 When I recently moved, I unfortunately found that my ISP used double-NAT for their customers. This meant for services I run on my home network that don't support IPv6, such as Plex, or my file share, I was unable to access them externally. To address this, I identified that a hub-spoke VPN configuration would allow me to access my home network when on the go. I choose WireGuard as the VPN protocol for a multitude of reasons: it is highly efficient compared to older protocols like OpenVPN or IPSec, is natively included in the Linux Kernel starting with version 5.6, and is configurable via a typical network interface. By utilizing a server that is publicly accessible, you can route bi-directional traffic from a client not on-prem, into your home network: 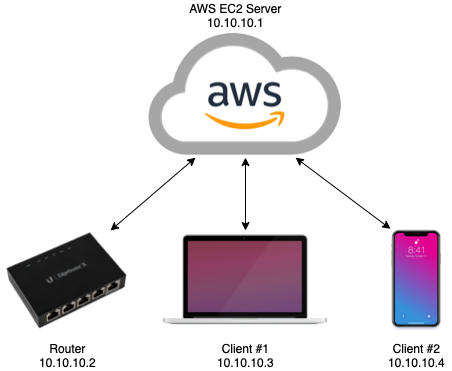 DNS for clients is routed back to my home DNS server (Pi-hole), with my internal domain configured as the search domain. This allows me to perform DNS lookups for clients on my home network, as well as my pi-hole for ad blocking on the go" Setup Installation/setup of WireGuard is fairly easy, and there are plenty of guides available for details. Besides configuring the WireGuard interfaces with the configuration specific to this setup (see below), the only other specific setup was to configure the security group in the AWS web console to allow inbound traffic to the port noted in the server's WireGuard config. Navigate to your EC2 Management Console and select your server instance. Click the security group that is attached to the instance, found under the "Security" tab. Under "Inbound Rules", click "Edit inbound rules". Add a rule with the following: Port range: enter the port you have in your server's WireGuard config Takeaways Configuring this did not come without challenges. Most notably, was the undertaking of re-IPing my home network. This was not strictly necessary, but it helps avoid IP conflicts between the network that I'm connected to on the go, and my home network. This configuration also selectively route only my private network ranges through the VPN to increase efficiency. This way if I want to stream a TV show, acccess, I'm not losing efficiency. When I first implemented this setup, I was using a Raspberry Pi as the gateway into my home network. However, I soon realized this task was best suited for my Router. I have a Ubiquiti router that runs their EdgeOS, which doesn't have native WireGuard support. I was able to find this fantastic WireGuard package that allows for implementing WireGuard on vyatta, which EdgeOS is built on top of. Since vyatta is a fork of Debian linux, getting this configured was fairly straightforward. Their Github wiki covers these steps in details. I route a 10.10.0.0/16 network through the VPN. Initially this was just a single /24 subnet, but I've found having each client correspond to a single network interface on the AWS server will allow for special configuration, such as mDNS reflection, without causing a reflection loop. This is next on my list to get implemented, since it allows access to even more services on my home network. Configuration Details 123456789101112131415161718 # AWS Server Config [Interface] Address = 10.10.10.1/24 PrivateKey = <private key here> ListenPort = 53131 PostUp = iptables -A FORWARD -i %i -j ACCEPT PostDown = iptables -D FORWARD -i %i -j ACCEPT # # LAN gateway [Peer] PublicKey = <public key here> AllowedIPs = 10.10.10.2/32, 192.168.111.0/24 PersistentKeepAlive = 25 # # Mobile client [Peer] PublicKey = <public key here> AllowedIPs = 10.10.10.3/32 12345678910 # Router (as gateway) Config [Interface] PrivateKey = <private key here> Address = 10.10.10.2/24 # [Peer] PublicKey = <public key here> AllowedIPs = 10.10.0.0/16 Endpoint = <public server domain name> PersistentKeepalive = 25 1234567891011 # Client Config [Interface] PrivateKey = <private key here> Address = 10.10.10.3/24 DNS = 192.168.111.2, <local domain> # [Peer] PublicKey = <public key here> AllowedIPs = 10.10.0.0/16, 192.168.111.0/24 Endpoint = <vps server> PersistentKeepalive = 25 |
Crowdsourced Drink Prices: Web App using ReactJS - 6/2/2020 My latest project came about when out the other night with some friends. We were at a bar that was crowded, and I wanted to order a cocktail, but some bars have ridiculously high prices for certain drinks, so I was hesitant. Bars rarely post their prices for each drink, especially cocktails. I came up with the idea of building an app to crowdsource drink prices for any bar, inspired by other crowdsourced apps like Waze and GasBuddy. The "Drink Up, Pay Less" App (DU-PL) was born. Front End: - React app written with JS ES6, HTML5, and CSS - Makes asynchronous requests to back end server, receives JSON data back Back End Server (RESTful Web API): - Nginx server acts as a reverse proxy to redirect traffic to a Node.js server Node.js Server interfaces with MariaDB to retrieve data MariaDB holds a database with a unique table for each bar Hosted on Amazon EC2 (Elastic Compute Cloud) Front End Detail: I had a solid foundation in JavaScript going into this project, but had never worked with UI libraries like React or Angular. I chose React due to its rising popularity over recent years, especially for building PWAs (Progressive Web Apps). I decided to build a web app instead of a native Android or iOS app due to the fees required to join their app store developer programs. Progressive Web Apps are growing in support, allowing the webpage to be installable to a user's home screen, caches content for faster load times, and has offline functionality for features that don't directly require internet access. Back End Detail: The internet facing server which receives HTTPS requests runs on Nginx which forwards requests to an Express (a NodeJS framework for web applications) server. This is done so that Node is not run as a superuser, which has security vulnerabilities. I generated a SSL certificate (CA signed) so that the front-end app running on HTTPS was able to send requests to the server. I used MariaDB (a branch of MySQL) for the relational database to store data submitted by users for venues and drinks. Tables are generated on the fly if they do not exist for a specific venue, so that the app is easily expandable for a multi-regional user base. Initially I tried hosting the server myself, but ran into problems with my ISP blocking requests to ports 80 and 443, even though they claim not to. I ported it all to Amazon's EC2 service which allows for scalable operations, and allows some extra security in my home network by not hosting it myself. Finished Project: The app is currently live at: du-pl.com . Please check it out and feel free to leave feedback! I found the process very enjoyable and am happy I was able to add to my JavaScript development skills, as well as getting valuable experience using popular libraries and frameworks like React, Node.js, Nginx, and MariaDB. Future Plans: Moving forward I plan to continue to add more features to the site, like user accounts to favorite/bookmark venues, and the ability to search local venues for specific drinks. Ideally in the future I would port the app to React-Native, which would give me the ability to compile the app for XCode and Android formats. I would then host them on the iOS App Store and Google Play Store, as users would prefer a native app to a web app, as updates can be pushed automatically and the app can be found easier by new users. |
Sneaker Bot (Python and Selenium) - 4/5/2020 Having been an avid sneaker collector since high school, I've always had an eye open to combining my technical knowledge with my love for sneakers. In the sneaker community it has become very commonplace to use "bots" to purchase the latest sneaker releases, since time and repetitive attempts are key to being able to get a pair. Back in high school had written a simple Javascript program to automate a few button clicks through a Chrome browser extension, but now that my coding experience and knowledge has increased, I thought I would take a crack at making a fully encapsulated desktop program. I chose to use Python as the primary language for this project as I haven't built a GUI before in Python and I thought that would be a good exercise. I was able to find the popular automated web testing framework Selenium. Selenium Webdriver gives the ability to control a browser window through code, such as window locations, button clicks, and more. It is a very straightforward package to install and use, as well as having a popular community with good resources. I built the GUI using elements from PyQt, a Python binding of the popular cross-platform toolkit Qt. This gave me easy access to pre-built elements like buttons, text field, and more, which I was able to access as objects through my code. Current Features - The list of URLs, sizes selected, and proxy info can be saved to a custom ".hcp" format file allowing for import and export. - Preview images of the selected sneaker. - Notification if a specified size is out of stock. - Circumvention of basic automated access detection. - An API call to my webserver to run a check on a verification code to use the program. - Proxy support, as IP based bans are possible if a website is able to detect you are using a bot. - Implementation of multi-threading in order to allow multiple bot instances to run at once. - Threads are able to be terminated by the user using flags between functions. - Any cart instance is able to be open and checked out by the user through transferring cookies between browser sessions. Wrap Up The current version of the "HolyCopBot (hcp)" is available on my Github at this page, with future revisions planned! |
Donating CPU Cycles to Fight COVID-19! - 4/13/2020 Reading the title of this post might be a bit confusing, so let me start from the beginning. I was browsing Youtube this weekend when I saw ETAPRIME, who does Raspberry Pi and other SBC Computer projects, made a video with a similar title. I watched his video and learned about a program called BOINC, the Berkely Open Infrastructure for Network Computing. This program allows multiple computers to be given a distributed workload for solving complex problems, effectively acting as a supercomputer. There are various projects that are run through the infrastructure, but one in particular, called Rosetta@home, is run by The Baker Lab at the University of Washing, which is dedicated to understanding the complex structure and function of proteins. They have turned their attention to SARS-COV2 virus and recently were given extra help to allow their software to run on ARM based computers. I spent the weekend setting up my Raspberry Pi 4 with 4GB RAM to run uninterrupted on the Rosetta@home Project, since I wasn't currently using it for any personal projects. However after checking the available workload page, I noticed there was a lot more work available to be done by Intel based CPUs, so I also set up my PC to run BOINC and Rosetta@home overnight, as I wouldn't be using my laptop at night anyway. I'm happy to be contributing in any way I can while following stay at home orders! You can view my total contributions at the link below. Moving forward in the next few days I will be setting up BOINC on my old laptop, as well as another SBC computer I have, an ODROID XU4, so that I can contribute as much as possible! https://www.boincstats.com/stats/-1/user/detail/43a209fd451d84a19b724a29d3a6bc8f |
Arduino Heater Controller - 1/6/2020 Since the cold has rolled in the past weeks, I've been running the space heater in my bedroom, but the heater's temperature control is horrible. It consistently overheats and underheats the set temperature, which I would assume either comes from a cheap temperature sensor or the fact the sensor is located directly next to the heating element, so I finally decided to do something about it. The Plan To use a microcontroller to monitor the room's temperature, then trigger temperature changes on the heater or shut it off using infrared signals, spoofed from the original remote. BOM - Arduino Mini (only used this specifically since I had a spare) - DHT11/22 Temperature Sensor - Infrared Sensor (For capturing codes only) - Hookup Wire to use as jumpers on the board - 5V Power Supply (Minimum 0.5A) - PCB Proto-board/Breadboard Hardware First I organized then soldered everything on the board. The NPN transistor is used so that the IR LED can be powered with 5V, which gives a stronger signal, rather than from the Arduino. The BT module will be used for external commands from my Raspberry Pi over the serial port. I tried to space the DHT sensor as far as possible from the Arduino and the BJT to prevent heat interference. With all that done, let's move onto the software! Software I knew I needed a few libraries before I began to code so I added them through the Arduino IDE library manager: - DHT.h: Interfacing with the DHT sensor (very straightforward to use with either DHT11/22) - IRremote.h: Very helpful IR library for spoofing IR commands - AdafruitSleepyDog.h: Library for sleeping with the watchdog timer - SoftwareSerial.h: Using digital pins as serial tx/rx pins The AdafruitSleepyDog library is very helpful for projects where low power is a concern, since power-down sleep function included on atmega328p chips is very low power and is able to be woken up by the watchdog timer (can be compared to other sleep modes on the 328ps datasheet). Even though I wanted to use a power supply with this project, I wanted the flexibility to use a battery, as well as attempting to lower power consumption if it was going to be plugged in all the time. The watchdog timer can only run for 8 seconds, a loop was necessary for it to sleep for 2-3 minutes as planned. The IRremote.h library was the backbone for the implementation of this project, as my space heater has a simple IR remote paired with it. I was able to spoof the remotes commands by using an IR sensor and reading the raw bytes, as well as the hex data of each button's signal. Luckily, the remote uses the NEC IR Protocol, which is included in the library. This means I can send the hex data, instead of the raw data with bursts/spaces. I used the SoftwareSerial library to add a HC-05 Bluetooth module to the remote. This will be used to read the serial port on every wake cycle, looking for a string sent by my Raspberry Pi, which will be read as chars to execute specific commands. I did this so I can use a python script on the Raspberry Pi to interface with the Arduino. The HC-05 is constantly paired to the Pi and can be repaired if disconnected by running a Python script. The commands that the Pi sends over include power on/off, changing the set temperature, and setting a timer. The temperature is automatically lowered at night and raised during the day by adding two python scripts to crontab, executing at 8:00AM and 11:30PM respectively. Wrap Up After putting this remote into use for a few days and debugging, I realized the DHT11 Temperature sensor with an error range of +/-2.0 degrees C is too high for room temperature control. After replacing the sensor with a DHT22 (same pinout and minor code changes) the remote works as expected and my bedroom's temperature is much more consistent! The Arduino code as well as the python scripts can be found on my Github! |

